| 利用python画空间分布图 | 您所在的位置:网站首页 › python cpk分布图 › 利用python画空间分布图 |
利用python画空间分布图
|
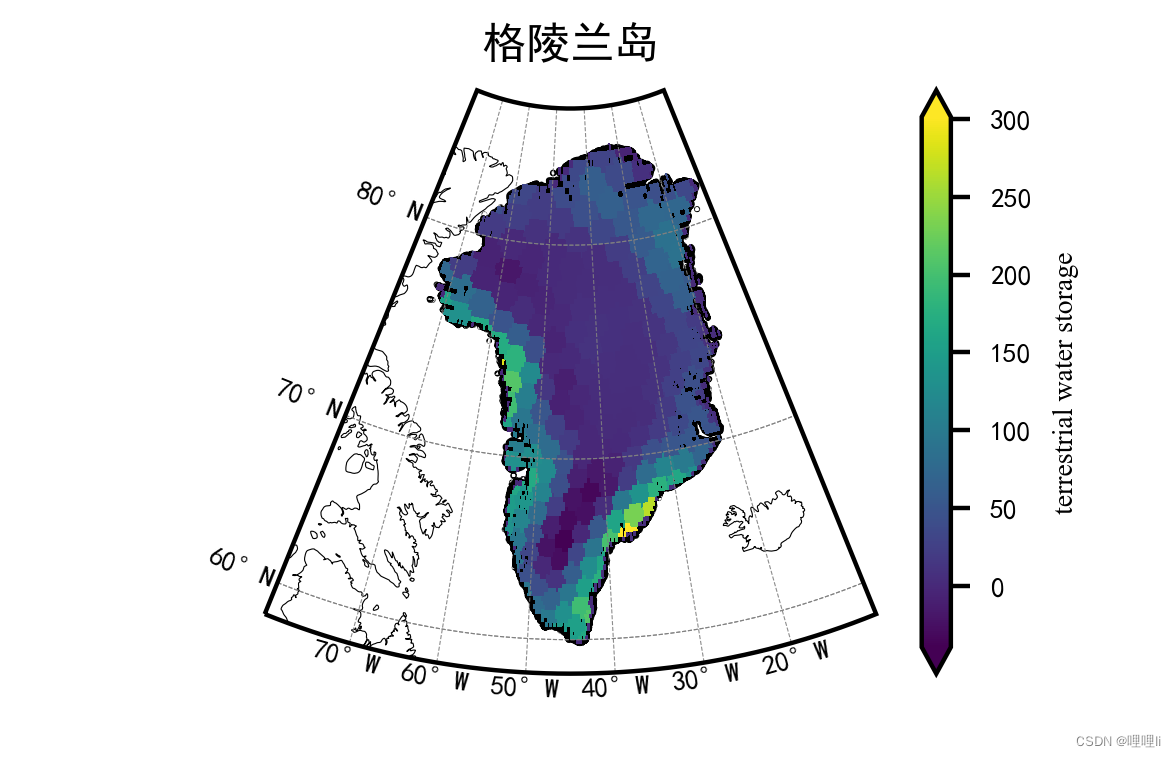
最近在用matlab跑数据,时间比较充足,所以想学一下python来画空间分布图,之前没有接触过python,感觉画图会比matlab更好看更流畅一些。画下来确实有耳目一新的感觉。 还是利用第一篇笔记里的数据,画格陵兰岛的某数据的空间分布,初步绘制出来的结果如下。
1.如何保持二次曲线外观,在GitHub上有相关代码 GeoAxes.set_extent on non-cylindrical projections · Issue #697 · SciTools/cartopy (github.com) 链接在此 如何在Cartopy's LambertConformal中限制经度范围并保持二次曲线外观? - 问答 - 腾讯云开发者社区-腾讯云 (tencent.com) 搬运的中文版 xlim = [-120, -60] ylim = [60, 80] rect = mpath.Path([[xlim[0], ylim[0]], [xlim[1], ylim[0]], [xlim[1], ylim[1]], [xlim[0], ylim[1]], [xlim[0], ylim[0]], ]).interpolated(20) proj_to_data = ccrs.PlateCarree()._as_mpl_transform(ax) - ax.transData rect_in_target = proj_to_data.transform_path(rect) ax.set_boundary(rect_in_target)以上是代码的关键部分 我自己的代码如下 import numpy as np import pandas as pd import cartopy.crs as ccrs import matplotlib.colors as mcolors from cartopy.io.shapereader import Reader import matplotlib.pyplot as plt import matplotlib.ticker as mticker import cartopy.feature as cfeature from matplotlib import rcParams from osgeo import gdal import csv from shapely.prepared import prep import shapefile import shapely.geometry as sgeom from cartopy.mpl.ticker import LongitudeFormatter, LatitudeFormatter from pylab import * from mpl_toolkits import axisartist import matplotlib.path as mpath import numpy as np import cmaps import matplotlib.pyplot as plt import matplotlib as mpl from matplotlib.colors import ListedColormap cmaps.BlueWhiteOrangeRed #引用NCL的colormap # 设置字体 config = {"font.family": 'SimHei', "font.size": 16, "mathtext.fontset": 'stix'} rcParams.update(config) rcParams['font.sans-serif'] = ['SimHei'] # 用来正常显示中文标签 rcParams['axes.unicode_minus'] = False # 用来正常显示负号 # 读取数据 data = np.loadtxt(open("F:\浏览器\gracedata.csv", "rb"), delimiter=",") # 提取csv的某一列 # data_info = pd.read_csv('F:\浏览器\GRACE-TWSA.csv') data = data.reshape(-1, 1) # 一行转换为一列 data.resize((252, 122)) data = np.transpose(data) x = np.linspace(-73.125, -10.375, 252) y = np.linspace(59.375, 89.625, 122) xx, yy = np.meshgrid(x, y) # 绘制掩膜 filePath = r'E:\greenland\greenland\greenland.shp' with shapefile.Reader(filePath) as reader: gl = sgeom.shape(reader.shape(0)) def polygon_to_mask(polygon, x, y): """生成落入多边形的点的掩膜数组.""" x = np.atleast_1d(xx) y = np.atleast_1d(yy) mask = np.zeros(x.shape, dtype=bool) # 判断每个点是否落入polygon, 不包含边界. prepared = prep(polygon) for index in np.ndindex(x.shape): point = sgeom.Point(x[index], y[index]) if prepared.contains(point): mask[index] = True return mask mask = polygon_to_mask(gl, xx, yy) # 绘制图像 data = np.flipud(data) data_mask = np.ma.array(data, mask=~mask) print('data_mask:', data_mask) print('mask:', mask) # %% # 创建绘图空间,使用兰伯特投影 fig = plt.figure(figsize=(3, 2.5), dpi=400, linewidth=1) # 创建figure对象 # ax1 = plt.axes() # 投影设置 lon1, lon2, lat1, lat2 = [-80, -10, 58, 85] # ----------------------------------------------------------------------------- rect = mpath.Path([[lon1, lat1], [lon2, lat1], [lon2, lat2], [lon1, lat2], [lon1, lat1]]).interpolated(150) name = 'NearsidePerspective' proj = ccrs.LambertConformal(central_longitude=(lon1 + lon2) * 0.5, central_latitude=(lat1 + lat2) * 0.5) ax = fig.subplots(1, 1, subplot_kw = {'projection': proj}) # ---关键部分-------关键部分------------------关键部分-------------------关键部分---------- proj_to_data = ccrs.PlateCarree()._as_mpl_transform(ax) - ax.transData rect_in_target = proj_to_data.transform_path(rect) ax.set_boundary(rect_in_target) ax.set_xlim(rect_in_target.vertices[:, 0].min(), rect_in_target.vertices[:, 0].max()) ax.set_ylim(rect_in_target.vertices[:, 1].min(), rect_in_target.vertices[:, 1].max()) # ***************************************************************************** # ***************************************************************************** # ax.spines['bottom'].set_linewidth('0.2') # 图名 ax.set_title('格陵兰岛', fontsize=8, loc='center') # ax.add_feature(cfeature.OCEAN.with_scale('50m')) # ax.add_feature(cfeature.LAND.with_scale('50m')) ax.add_feature(cfeature.COASTLINE.with_scale('50m'), linewidth=0.1) cmap = cmaps.BlueWhiteOrangeRed #引用NCL的colormap newcolors = cmap(np.linspace(0,1,12))#分片操作,生成0到1的12个数据间隔的数组 newcmap = ListedColormap(newcolors[::1]) #重构为新的colormap # 绘制中国边界 cs = ax.pcolormesh(xx, yy, data_mask, transform=ccrs.PlateCarree(), cmap= newcmap)2.关于填色:使用plt.imshow(绘制热图) 或者像我的图一样使用pcolormesh. 3.关于cartopy库的安装不再赘述。
|
 关于绘图中的难点:1.二次曲线外观(扇形的地图) 2.填色 3.cartopy库的安装!!!属实在库的安装上折腾了好久
【本文地址】
公司简介
联系我们